How to Draw Faces for Beginners
I avoided drawing faces for an embarrassingly long time. Like years. I’d draw bodies with the head turned away, or hair covering everything, or a little blank circle where a face should go, all because I was convinced faces were some impossible secret skill I just didn’t have. Spoiler: they’re not. Faces are just shapes in predictable places, and once somebody actually explained the structure to me, my portraits went from “uncanny potato” to “oh hey, that looks like a person.” So let me be that somebody for you. This is how to draw faces for beginners, explained the way I wish someone had explained it to me.
We’re going to keep it simple and structural. No intimidating anatomy lectures, just a reliable method you can use today and a few practice ideas to lock it in.
The big secret: faces are mostly a predictable map
Here’s the thing that broke my brain in the best way: the features on a face sit in roughly the same spots on almost everyone. There’s a basic map, and once you know it, you stop guessing where the eyes go and start placing them with confidence. Individual people vary, sure, but the underlying layout is shockingly consistent.
So before we draw a single eyelash, we’re going to learn the map. Trust the map. The map is your friend.
Step one: the ball and the jaw
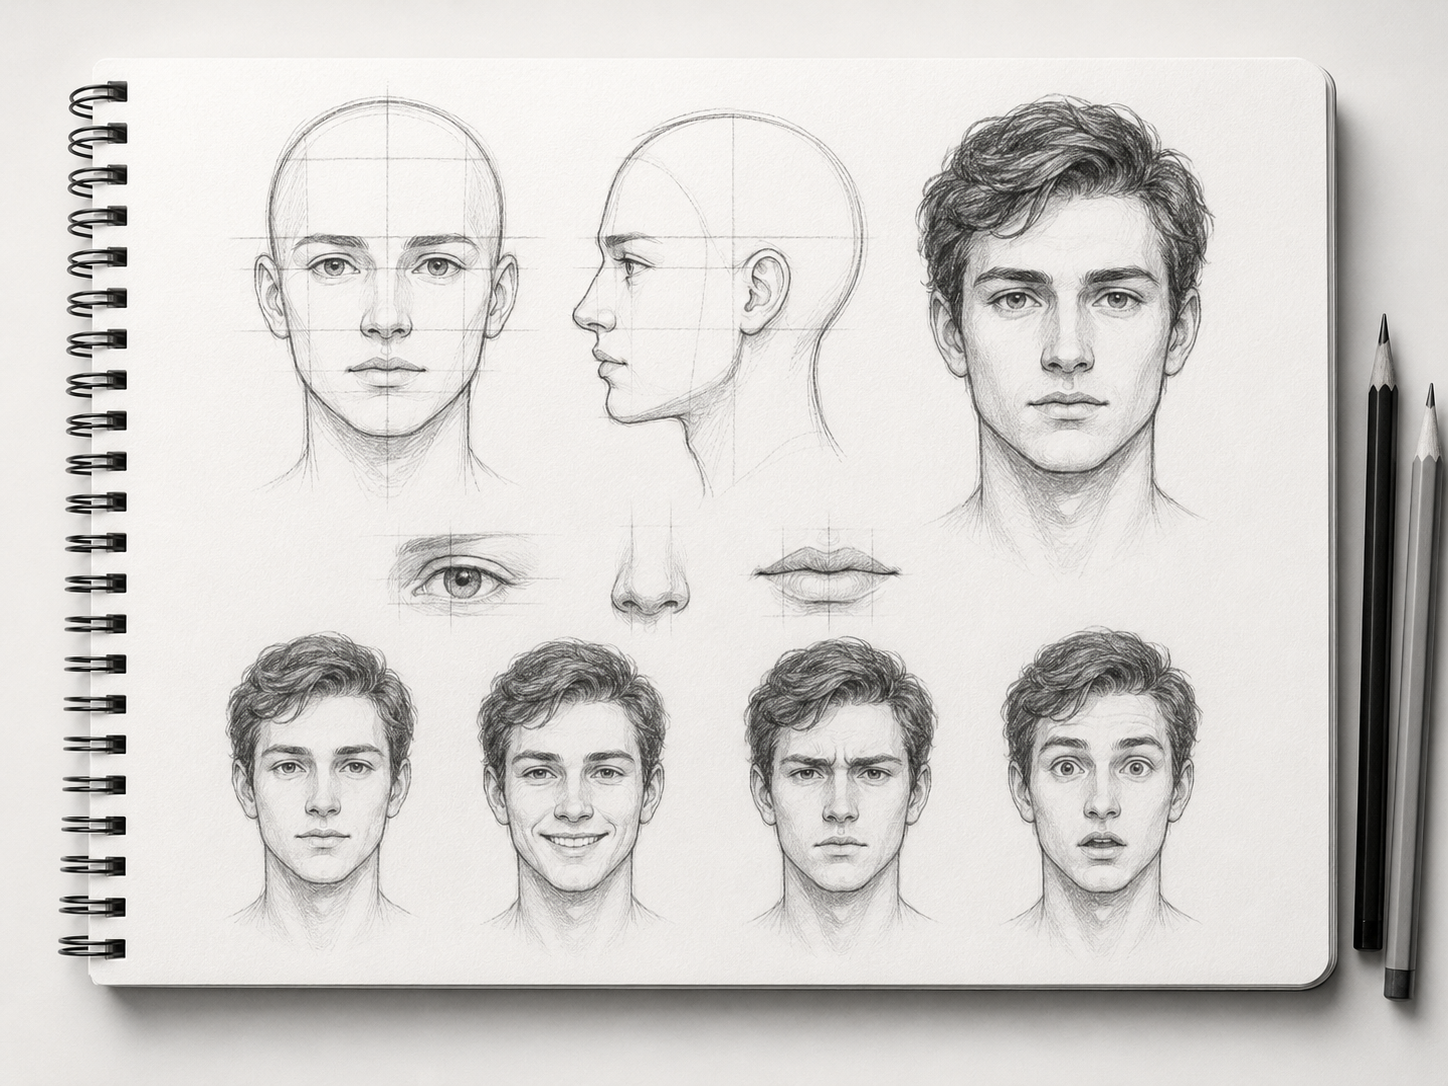
Start with a circle. Not a perfect one, just a ball. This is the top and main mass of the skull. Then, off the bottom of that ball, draw the jaw, which tapers down to the chin. For a front-facing head, think of the overall shape like an egg, wider at the top, narrower at the chin.
This egg is your foundation. Most beginners skip straight to features and wonder why the face looks off. The face looks off because the skull underneath it was never established. Build the egg first, every single time.
Step two: the guidelines that place everything
Now we divide the egg up. This is the part that feels like magic the first time it works.
- A vertical center line down the middle of the face. This tells you which way the head is facing and keeps both sides symmetrical.
- A horizontal line for the eyes, and here’s the part that surprises everyone: the eyes sit roughly in the middle of the head, not near the top. We always want to put them too high. Resist that urge. Halfway down.
- The bottom of the nose sits about halfway between the eye line and the chin.
- The mouth sits about a third of the way down from the nose to the chin, a little closer to the nose than the chin.
Lightly sketch these lines. They’re scaffolding, you’ll erase them later. But while they’re there, they do all the heavy lifting of placement so you can just drop features onto them.
Step three: the features, one at a time
Now the fun part. Let’s place each feature on the map.
Eyes: A classic guideline is that a face is about “five eyes wide,” meaning there’s roughly one eye-width of space between the two eyes. That gap is the thing beginners most often get wrong, so eyeball it (pun intended) and check that the space between matches the size of an eye. Eyes are almond shapes, not perfect circles, and they have eyelids, so don’t just draw two floating ovals.
Nose: You don’t need to render every plane of the nose. For a simple face, suggest it. The bottom of the nose with two nostrils and a hint of the bridge is plenty. Noses live in shadow more than line, so go light.
Mouth: The mouth is wider than you think, and the corners often line up roughly under the pupils or the inner edge of the irises. The top lip is usually a little darker and the bottom lip catches more light. Even a simple line with a soft shadow underneath reads as a mouth.
Ears: Here’s a freebie that makes faces instantly more correct. On a front-facing head, the ears sit between the eye line and the bottom of the nose. Line the top of the ear up with the eyes and the bottom with the nose, and you’ll never put ears in a weird spot again.
Step four: hair and the final shape
Hair sits on top of the skull, not glued flat to it, so give it some volume and let it puff out a bit beyond the egg. A super common beginner mistake is drawing hair like a tight helmet pressed against the head. Real hair has lift. Think of it as a mass with a direction and a flow, not individual strands. Block in the big shape of the hair first, then add a few strands for texture at the end.
Once the hair’s in, refine your outer face shape, clean up your guidelines, and you’ve got a face. An actual, recognizable human face. Look at you.
Expressions are where it gets really fun
A face with no expression is fine, but a face with a clear emotion is alive. And the cool thing is, expressions come mostly from two areas: the eyebrows and the mouth. The eyes help, but eyebrows and mouth do most of the talking.
- Happy: Mouth corners up, and crucially, a little squint in the eyes. A smile that doesn’t reach the eyes looks fake, and that’s true in drawings too.
- Angry: Eyebrows pulled down and together, mouth tight or turned down.
- Surprised: Eyebrows way up, eyes wide, mouth open and round.
- Sad: Inner corners of the eyebrows lifted up, mouth corners down.
Practice making the same face go through different emotions just by changing those two things. It’s a fantastic exercise and it teaches you how much feeling you can pack into tiny adjustments.
The practice plan that actually builds the skill
Knowing the steps is one thing. Drilling them until they’re automatic is what actually makes you good. Here’s how I’d structure your first couple weeks if faces are your goal.
Don’t try to draw a perfect finished portrait on day one. Instead, do lots of quick studies focusing on one thing at a time. Spend a session just placing the egg and guidelines over and over. Spend another just on eyes. Then noses, then mouths, then putting it all together. Targeted reps beat random full attempts every time.
This is exactly where prompts save you, because you don’t want to spend your practice energy deciding who to draw. The portrait drawing prompt generator hands you a subject, an expression, an angle, and a lighting setup, so you can just focus on the structure. You’ll get prompts like a “tired nurse with a guarded expression” or a “weathered sailor squinting at bright light,” which give you specific emotions and angles to practice instead of drawing the same neutral front-facing face a hundred times.
Lighting takes a flat face and makes it pop
Once you’re comfortable with the structure, the thing that levels up your portraits the most is light. A face lit from one clear direction, with soft shadows on the opposite side, looks ten times more three-dimensional than a flat, evenly-lit face. You don’t need to render perfectly, just decide where the light’s coming from and keep your shadows consistent with that.
Try the same face under different lighting: soft window light, hard side lighting, dramatic noir lighting from below. The structure stays the same, but the mood changes completely. That’s a really fun thing to experiment with once the basics feel solid, and it’s a great use of the detailed prompts that specify a lighting setup for you.
A few supplies that help (but aren’t required)
You can absolutely learn faces with a single pencil and printer paper, so don’t let gear become an excuse. That said, a couple of things genuinely make face practice smoother. A softer pencil (something in the B range) gives you easier, richer shadows for modeling the form of the face, which matters a lot once you start adding light. A kneaded eraser is lovely because you can dab out soft highlights, like the shine on a lower lip or the bridge of the nose, instead of harshly scrubbing. And a simple blending stump (or honestly just your finger) helps you smooth the soft transitions on skin.
If you’re digital, the equivalent perks are a soft round brush for shading and the ability to lower your opacity for those gentle guideline sketches. But again, none of this is mandatory. The map in your head and the reps in your hand matter ten times more than the tools. I drew faces with a cheap mechanical pencil for years and improved just fine. Start with what you have, and only upgrade once you actually feel the limitation.
Be patient with yourself
Faces are genuinely one of the harder things to draw, partly because we look at faces all day, so our brains are hyper-sensitive to anything that’s even slightly off. That sensitivity is why your early faces might bug you. It’s not that you’re bad, it’s that you have a built-in face-detector that’s extremely picky. Everyone’s is.
So go easy on yourself, trust the map, and do the reps. Build the egg, drop the guidelines, place the features, add the hair, then play with expression and light. Do that consistently and your portraits will improve faster than you’d believe. When you’re ready to practice, head over to the portrait generator for an endless supply of faces to study, or hit the main drawing prompt generator if you want to mix faces in with everything else. Now go draw some people.