How to Draw Animals for Beginners
Animals were my white whale for the longest time. I could draw a person okay, but the second I tried to draw a dog it came out looking like a sad balloon with legs. If that’s you right now, please know there is hope, because animals are way more learnable than they look. The trick is that you stop trying to draw “a dog” or “a cat” as one impossible blob, and start seeing them as a few simple shapes connected together. So let’s talk about how to draw animals for beginners, the friendly way, with a method that finally made critters click for me.
We’ll cover the shape approach, gesture, the magic of getting the big proportions right, and a practice routine that actually sticks. By the end you’ll be drawing foxes and cats and sleepy bears without wanting to cry. Let’s get into it.
Everything is just simple shapes connected
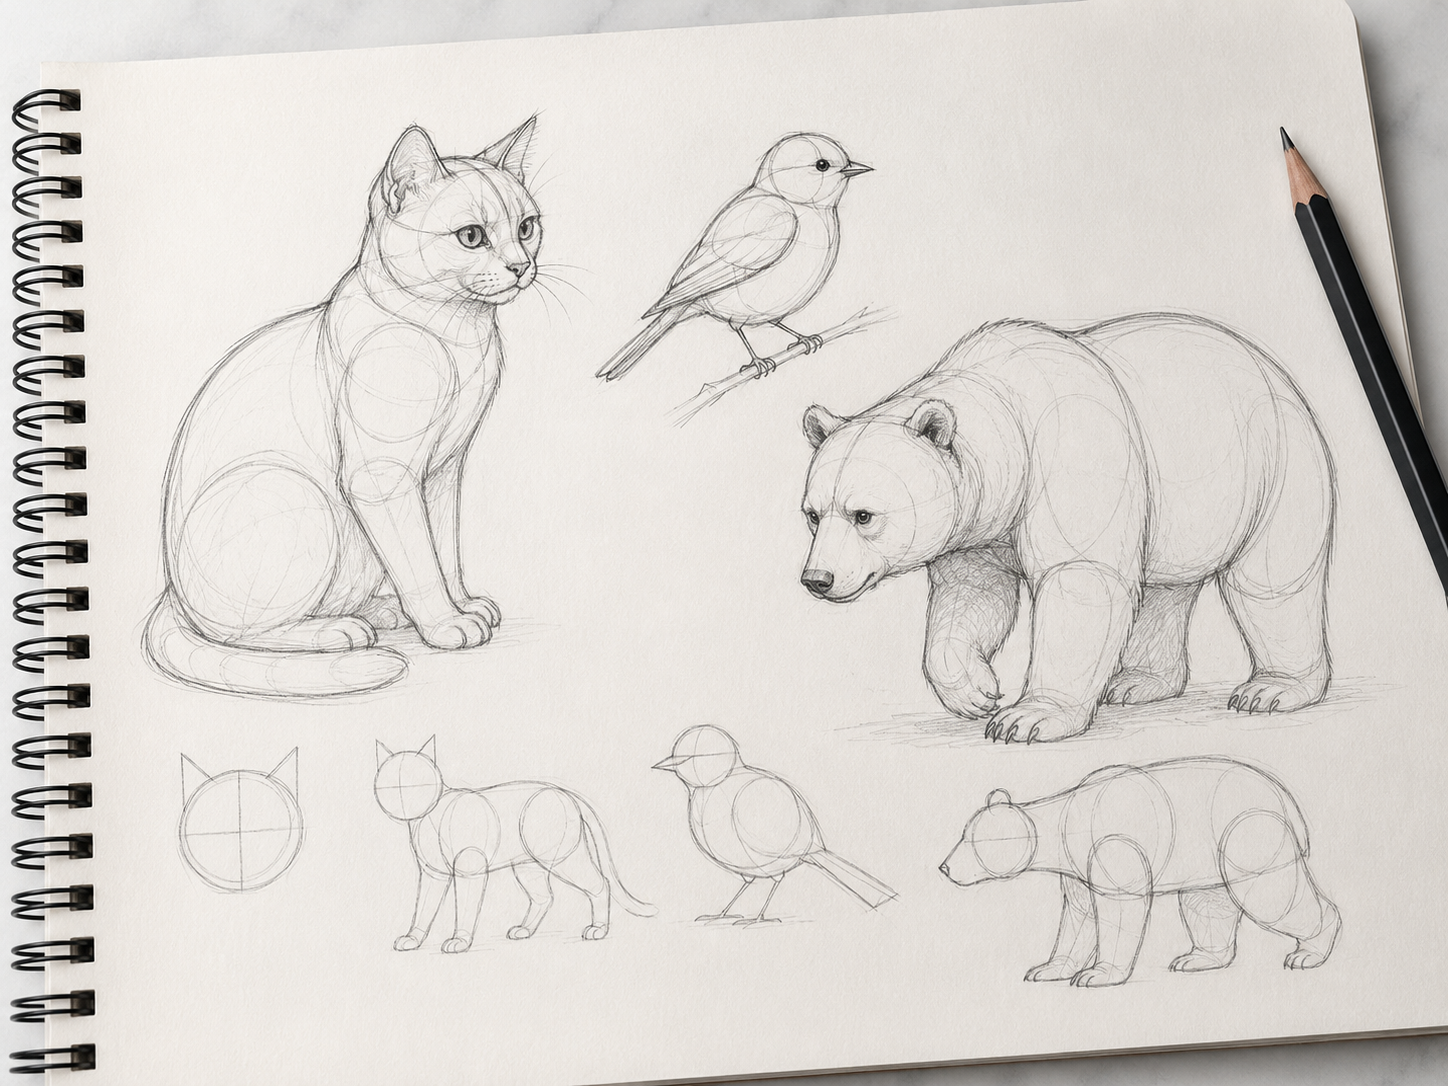
Here’s the foundational idea, and it applies to literally every animal: break the body down into basic shapes before you draw a single hair. A cat is a circle for the head, an oval for the chest, an oval for the hips, and tubes for the legs. A bird is a circle head and an egg body. A horse is a big oval body with a rectangular-ish head and four leg-tubes.
When you build the animal out of these big simple forms first, you get the structure and proportions right before you commit to any detail. Most beginner animal drawings go wrong because they start with the outline of the fur and try to “follow the edge,” which has no underlying structure holding it up. Build the shape skeleton, then wrap the form around it. This one habit will fix more of your animal drawings than any other tip.
Gesture first: capture the life, then the form
Animals move, and a stiff animal looks dead even if every shape is technically correct. So before I get precise, I do a quick gesture drawing, which is a loose, fast line or two that captures the flow and energy of the pose. The curve of a cat stretching. The alert tension of a fox about to pounce. The lazy droop of a sleepy dog.
A gesture drawing takes like ten seconds and it’s allowed to be messy. You’re not drawing the animal yet, you’re drawing the motion. Then you build your simple shapes on top of that energetic line, and the final drawing keeps that sense of life. Skip the gesture and your animals come out looking taxidermied. I cannot stress this enough: gesture first, structure second, detail last.
Get the big proportions right (this is the whole game)
If your animal looks “off” but you can’t say why, it’s almost always proportions. Specifically, the relationship between the head size, the body length, and the leg length. A common mistake is making the head too big, which accidentally turns every animal into a cute baby version of itself. Sometimes that’s the goal, but if you want it to read as an adult animal, watch that head-to-body ratio.
The fastest way to nail proportions is to actually look at reference. Pull up a photo of the animal and ask simple questions: How many head-lengths long is the body? Where do the legs connect? How long is the neck compared to the head? You don’t have to measure with a ruler, just notice the big relationships and try to match them. Drawing from reference isn’t cheating, it’s how every good animal artist learns. Your imagination fills in the gaps later, once you’ve trained your eye.
Start with these beginner-friendly animals
Not all animals are equally hard, so start with forgiving ones and work up.
- Cats: Super flexible shapes, lots of soft curves, and so much reference exists because the internet runs on cats. A great starting animal.
- Birds: Basically two circles and some wedges. An owl or a little round songbird is very achievable.
- Rabbits: Simple body, the long ears make them instantly recognizable, and you can keep the face minimal.
- Bears: Big, rounded, blocky shapes with no tricky thin legs. Forgiving and cozy to draw.
- Fish: Honestly one of the easiest. A teardrop body, some fins, done.
Avoid starting with horses (those legs are deceptively hard) or anything with complex antlers until you’ve got the basics down. Build confidence on the easy ones first.
Fur, feathers, and texture without overdoing it
Once your shapes and proportions are solid, you add texture, and here’s the big rookie trap: please do not draw every individual hair. It’ll take forever and somehow look worse, all scratchy and flat. Instead, suggest the fur. Use texture marks only where it counts, like along the edges of the body, in the direction the fur grows, and in the shadow areas. Let the smooth, well-rendered parts stay smooth.
For feathers, think in groups and layers rather than individual feathers, like overlapping scales of soft shapes. For short-fur animals, you barely need texture at all, just clean form and good shading. The texture is the seasoning, not the meal. A little goes a long way, and restraint reads as “skilled” while overdoing it reads as “anxious.”
The practice routine that builds real skill
Here’s how I’d structure your animal practice so it actually compounds. Don’t just draw random finished animals and hope. Be a little systematic.
Spend your first sessions doing nothing but gesture drawings, lots of fast loose poses, two minutes each, to train your eye for animal movement. Then add a few sessions on simple-shape construction with one animal type at a time. Then combine gesture plus construction into slightly more finished studies. Then, finally, add texture and detail. Each layer builds on the last.
The thing that keeps this from getting boring is variety of subjects and poses, which is exactly what the animal drawing prompt generator is great for. It gives you a specific animal, a pose, and a setting, like a “red fox stepping over a branch at the forest edge” or a “house cat resting on a windowsill in morning light.” Having the subject and pose chosen for you means you spend all your energy on the actual drawing skills instead of deciding what critter to attempt today.
A quick start-to-finish example
Let’s do one together in words. Prompt: “sleepy bear resting on a sunlit rock.” First, the gesture, one relaxed curving line for the slumped, cozy posture. Then the simple shapes: a big round head, a large rounded body mass, stubby limbs tucked in, because a resting bear is mostly one big comfortable blob. I check proportions against a mental image of a real bear, keeping the head appropriately smaller than the body so it reads as an adult. Then I refine the form, rounding things out, suggesting the heavy weight of the animal pressing into the rock. Then texture, just a little rough fur along the back edge and in the shadows, leaving the lit top of the bear smooth. A shadow under the bear to ground it on the rock. Done, and it actually looks like a sleepy bear instead of a sad balloon.
Use reference without guilt, and find your style
Let me say this loudly for the people in the back: using reference is not cheating. It is how every professional animal artist works. Animals have specific, unfamiliar anatomy that you simply cannot accurately invent from memory when you’re starting out, so pulling up photos is the smart, normal thing to do. The goal isn’t to copy a photo slavishly forever, it’s to study real animals enough that the structures sink into your memory and eventually you can draw them from imagination. Reference is the training, not the crutch.
A great habit is to do a quick “study” before a “drawing,” meaning you copy a reference photo to learn the structure, then close the photo and draw the animal your own way using what you just learned. That two-step process builds real understanding fast.
And about style: you don’t have to draw photorealistic animals to be “good.” Cute simplified animals, loose expressive sketches, bold graphic shapes, soft realistic studies, these are all valid and wonderful. Your style emerges naturally from how you choose to simplify, so don’t force it. Just keep drawing lots of animals, lots of ways, and over time you’ll notice yourself gravitating toward certain shapes, line qualities, and levels of detail. That gravitational pull is your style forming. Let it happen on its own.
Be patient and keep it playful
Animals take a little patience because there are so many of them and they all have different structures. But the core method never changes: gesture for life, simple shapes for structure, reference for proportions, restrained texture for the finish. Internalize that order and you can tackle basically any creature, even ones you’ve never drawn before.
So go make some critters. Start with a cat or a bird, keep your first attempts loose and forgiving, and lean on reference without shame. When you want an endless parade of animals to practice, the animal generator has you covered, or swing by the main drawing prompt generator to mix animals into your wider practice. Your sad-balloon dog days are behind you. Now go draw something with fur.